Even if you have an Android phone or use another smart home platform like Amazon Alexa or Google Assistant, there’s a reasonable chance you own an Apple device you’d like to squeeze the most out of. If you don’t, you might still be wondering what things are like on the other side of the fence. Either way, you’ll want to check out our guide to Apple HomeKit, including what it can do, how to set it up, and some of the better HomeKit-compatible accessories out there.
Apple HomeKit guide
What is Apple HomeKit?

In short, HomeKit is Apple’s smart home framework. Certified HomeKit accessories can be controlled via the Apple Home app for iPhone, iPad, Mac, Apple TV, Apple Watch, and iPod touch. You can also control accessories via Apple’s Siri voice assistant, found on the above devices, as well as HomePods and a small number of third-party speakers.
A wide range of accessories can be added to HomeKit, from locks, lights, and security cameras to TVs, Wi-Fi routers, and garage door openers. We’d list every category, but the platform’s reach is continually expanding, at this point limited more by what companies are willing to make than by software barriers.
Apart from being Apple-centric, HomeKit’s defining feature is security. Data is heavily encrypted, to the point that this was once an obstacle to support — until iOS 11.3, accessory makers had to use hardware-based authentication to get their products working. Users, meanwhile, have traditionally had to go through more complicated pairing than what Amazon or Google allows, the tradeoff being a higher degree of privacy and resilience against hackers.
Related: The smart home privacy policies of Amazon, Apple, and Google
How does Apple HomeKit work?

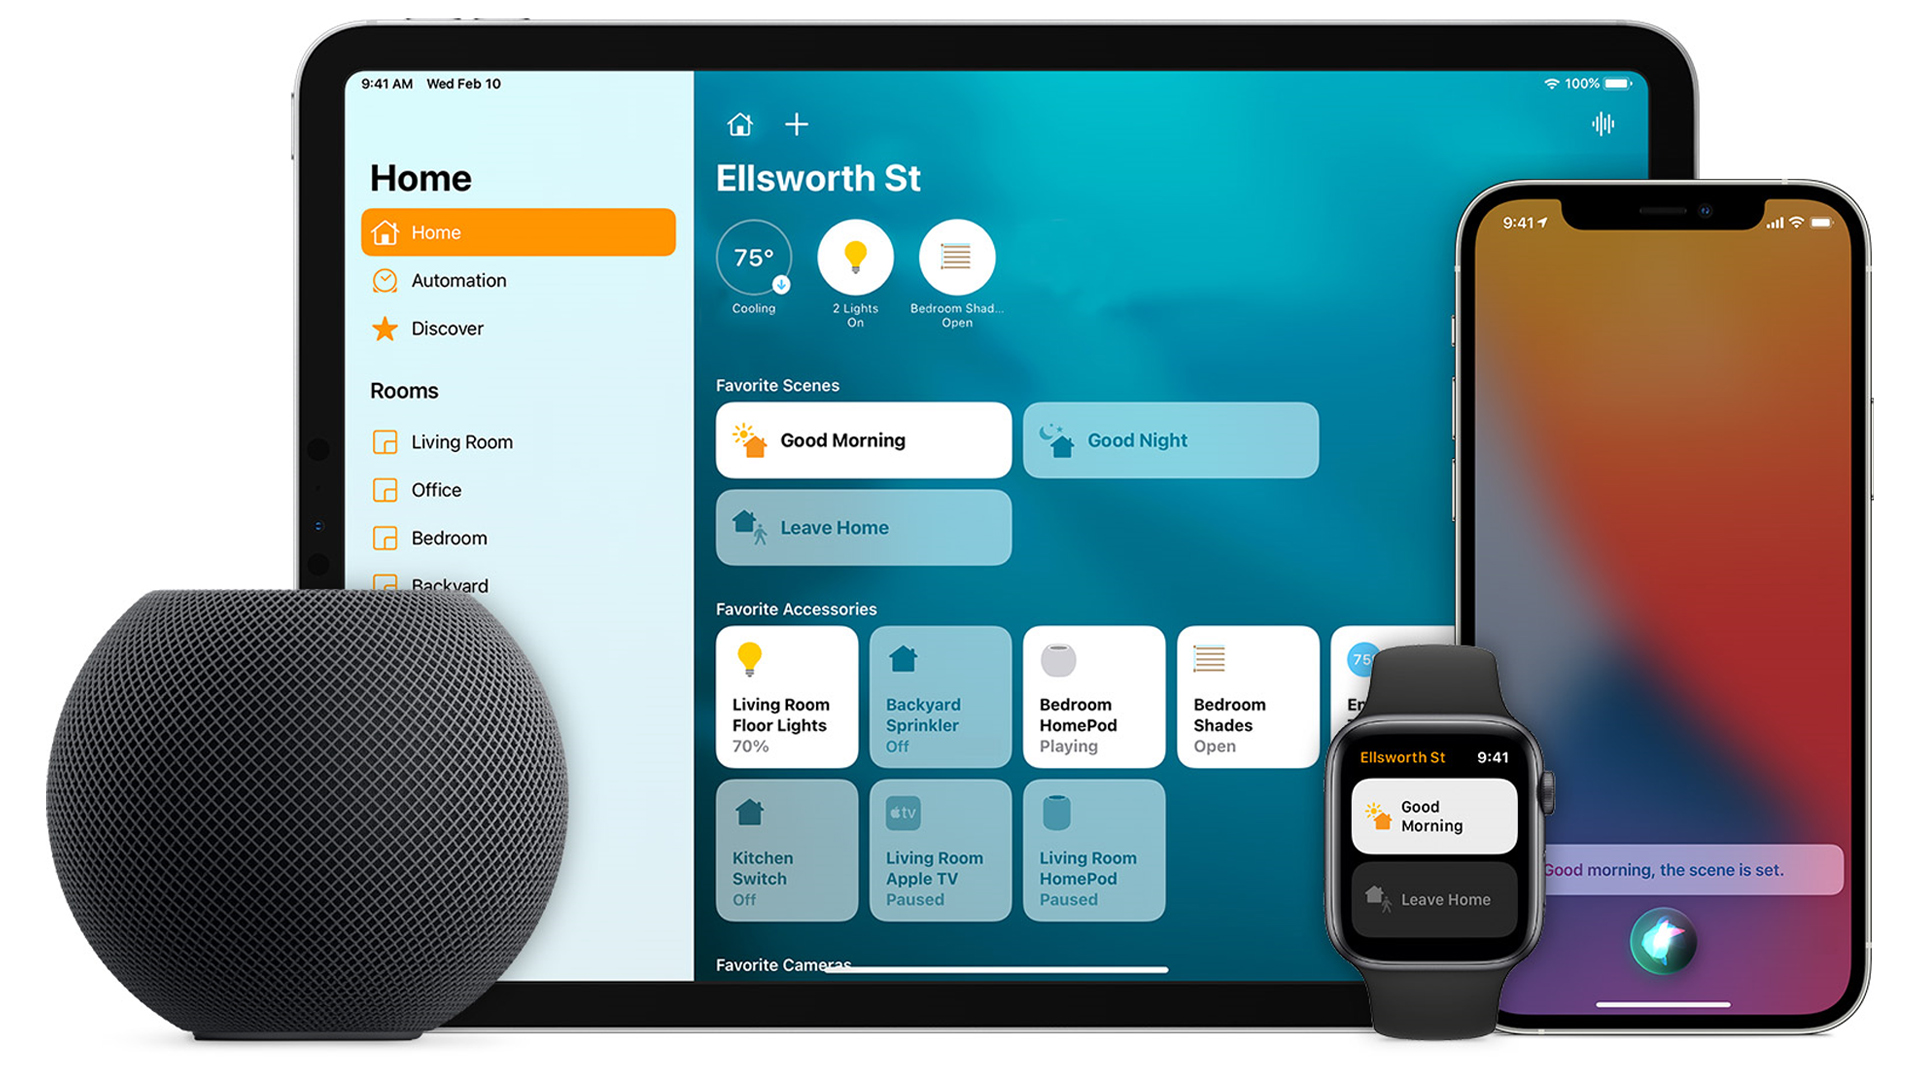
We’ll go into this more in later sections, but the gist is that once you’ve created a “home” location in the Apple Home app, you pair accessories with the app using an iPhone, iPad, or iPod touch. Each accessory appears as a tile with its name and most important status details. Tapping and holding on a tile on touchscreen devices reveals more information and controls. Accessories can be linked together via rooms, zones, scenes, and automations.
You’ll need an iPad, HomePod, or Apple TV serving as a first-party HomeKit hub — formally known as a Home Hub.
Rooms are just what they sound like — accessory groups based on a particular place in your home, such as the kitchen or living room. This is particularly important for voice control, so when you tell Siri to “turn on the living room lights,” for example, it can automatically select every light in that space.
Zones allow you to group rooms together, for instance linking your kitchen, living room, hallway, and downstairs bathroom into a “downstairs” zone if you want to control the entire floor.
Scenes trigger multiple accessories at once, whether via Siri, the Home app, or an automation. A “Good Morning” scene might turn on the bedroom, bathroom, and kitchen lights, open the living room blinds, and raise the temperature on your thermostat. You don’t need to create scenes, but they can greatly simplify things later.
Automations trigger accessories without your input. These can be based on a device location, time of day, accessory use, or sensor data. You’d probably want that “Good Morning” scene to launch when it’s time to wake up, and you might have an “I’m Leaving For Work” scene trigger when your iPhone leaves your house, automatically locking your doors and shutting off lights. Similarly, you might have all the lights turn on if a security sensor is tripped.
Some accessories may require linking third-party accounts and/or installing dedicated hub devices. In any event, you’ll need an iPad, HomePod, or Apple TV serving as a first-party HomeKit hub — formally known as a Home Hub — since this is what allows remote access via the internet, and ensures automations run regardless of whether you’re physically present. You might want to add a Homebridge hub to rope in non-HomeKit accessories, but that’s not for beginners since it requires some technical expertise.
Read: How to use Homebridge
Is Apple HomeKit right for you?

If you have any HomeKit-compatible accessories, and an iPhone or iPad is an integral part of your daily life, it simply makes sense to enable HomeKit, even as a secondary control option next to something like Alexa or Google Assistant.
The more invested you are in Apple products, the more sense it makes to prioritize the platform. There’s an interconnectedness between Apple devices that Amazon and Google are racing to keep up with. For instance, if you have an Apple TV, you can use HomeKit to pair a couple of HomePods as TV speakers, watch feeds on compatible security cameras and doorbells, and control your TV from your Apple Watch.
The more invested you are in Apple products, the more sense it makes to prioritize the platform.
That said, there are reasons you might favor Alexa or Google over HomeKit, even if you are a diehard Apple fan. It’s often easier to pair accessories with those first two options, which may not sound like a big deal until you have to re-pair an accessory and forget where its HomeKit code is. For whatever reason, HomeKit is also more prone to losing contact with accessories, leading to dreaded “no response” errors in the Apple Home app. You can mitigate this with solid Wi-Fi and Home Hub coverage.
The biggest knock against HomeKit is available accessories. While you can typically find products to cover every need, support is far broader for Alexa and Google Assistant, giving users of those platforms more choice. That’s especially true when it comes to smart speakers and displays. Whereas Amazon and Google have a variety of first-party devices plus extensive third-party support, Apple’s only speaker at the moment is the HomePod mini, and the closest thing it has to a smart display is the iPad mini.
See also: The best smart speakers you can buy
Apple HomeKit setup
Before getting started, you’ll need an iPhone, iPad, or iPod touch, since those devices are the only ones that can pair HomeKit accessories. You’ll also need an Apple ID (iCloud) account. Your HomeKit data is associated with them, and they’re required for functions like sharing control with family members, or saving footage in HomeKit Secure Video (if you have a paid iCloud plan and a compatible camera).
On your iPhone, iPad, or iPod, open up the Apple Home app. From here, tap the plus icon near the top of the screen followed by Add Accessory to begin pairing accessories. You’ll be prompted to scan a QR code with your camera or hold your device next to the accessory if it supports wireless pairing. Don’t worry — if you can’t find the QR code and wireless pairing isn’t an option, the accessory should have an alphanumeric code you can enter manually.
You can also use the plus menu to Add Rooms, though you’ll be prompted to assign accessories to rooms anyway as you pair them. Be careful if you choose to use custom room names over standard ones, since you’ll have to remember those names for Siri voice commands. Rooms can have their own wallpaper for easy visual identification.
If other people with Apple devices share your home, you can (and should) invite them to be members of your HomeKit household with the plus menu’s Add People option, which sends out email invitations with links and instructions. Once a person is in your household, they can control accessories via Siri and the Apple Home app, get their own voice profile on HomePods, and be included in location-based automations.
More: How to reset Apple HomeKit
How to use Apple HomeKit

The Apple Home app is the nexus of HomeKit — and perhaps its most important menu is found by tapping the home icon at the top of the screen, not to be confused with the Home tab at the bottom or side. This lets you switch between homes and rooms, and it’s also where you can find the Home Settings and Room Settings menus.
Home Settings includes options to manage household members and permissions, check the status of hubs and bridges, and toggle some specific device settings such as notifications. If you have any HomeKit-compatible speakers or TVs, you can control whether they’re accessible to everyone, anyone on the same Wi-Fi network, or only household members.
Open Room Settings if you want to edit room names or change their zones and photo wallpapers. It’s also the only way to delete an unused room — select a room, then the Remove Room button.
Controlling accessories
To control accessories directly, tap the home icon and select the room the accessories are in. Alternatively, you may have marked an accessory as a Favorite through its settings, in which case it’ll show up on the Home tab for faster access.
You can use a quick tap on some accessory tiles to control binary toggles, for instance, turning a light on or off, or locking and unlocking a door. Not every accessory supports this — thermostats, for example, will automatically open up a full-fledged control panel.
Every accessory has a control panel, including advanced options such as color and brightness for smart bulbs. If you scroll down or tap the gear icon, you can access device settings like Favorite status, which automations should be active, and whether or not it’s counted in the Home tab’s Status display. You’ll get a thumbnail view on the Home tab if you set a camera or video doorbell as a Favorite.
Siri voice commands are largely intuitive so long as you remember what you named your accessories, rooms, scenes, and/or zones. Here are some sample commands, all prefaced by “Hey Siri”:
- Turn the lights on/off.
- What’s the temperature in [room name]?
- Turn the [room name] lights on/off.
- Set the lights to [percentage].
- Lock/unlock the [room name] door.
- Turn the [smart plug name] on/off.
- Set the temperature to [degrees].
- Is the [room name] door locked?
Creating scenes
Here’s how to create a scenein HomeKit:
- Tap the plus icon in the Apple Home app, then Add Scene.
- Choose a scene name. Make this descriptive yet simple, because you may want to trigger it with Siri, for example, by saying, “Hey Siri, Good Morning.”
- Tap the Add Accessories button, then on any hardware you’d like to include. Hit Done when you’re finished.
- Back at the New Scene panel, tap and hold on accessories to choose what state they’ll enter once the scene is triggered. For example, a light bulb could be set to both turn red and lower brightness to 50%.
- Toggle Include in Favorites if you want it to appear on the Home tab’s dashboard. Regardless, you can tap Done when the scene is ready to go.
You can trigger a scene via Siri, automations, or tapping its name in the Home app. If it’s not in the Home tab, you’ll have to select the right room(s) to find it.
Building automations
To get started on an automation:
- Tap the plus icon, then Add Automation.
- Choose an Event that will trigger the automation. This can include household members coming or going, a time of day, an accessory being controlled, or a sensor detecting something. Time-based automations can be linked to sunrise or sunset offsets, and some Events can be given additional People conditions based on when one or more people are present or absent.
- Choose all the scenes and accessories you want to include in the automation, then tap Next.
- If any, tap and hold on accessory tiles to configure how they’ll respond when the automation runs.
- If you want an automation to run for a limited time, tap Turn Off to select when accessories will shut down. The default is “Never,” but you can select runtimes between one minute and four hours.
- If everything looks okay, hit Done.
You can see which automations you have active via the Home app’s Automation tab. Pick one here to see its details, tweak settings, and toggle it on or off.
Setting up a Home Hub
If you have a HomePod or Apple TV installed, it becomes a Home Hub by default — no intervention necessary. We’d strongly recommend using either of those as Hubs instead of an iPad, since iPads are portable devices meant to move around your home or leave entirely. Depending on your home’s layout, you might want multiple Hubs to ensure devices stay connected.
If you do want to use an iPad as a Home Hub, you’ll have to manually enable the feature:
- Make sure your iPad is signed in to the same Apple ID as your HomeKit home.
- Open the Settings app.
- Scroll down, and tap on the Home tab.
- Toggle on Use this iPad as a Home Hub.
Note that your iPad must not only be physically present in your home, but continually powered on and connected to Wi-Fi.
The best Apple HomeKit devices
Apple TV 4K

Eric Zeman / Android Authority
The Apple TV 4K is arguably the best dedicated streaming set-top on the market. It supports just about any standard you might care about, including Dolby Vision and Atmos, and its performance is silky smooth thanks to an A12 Bionic processor. In HomeKit, it serves as a Home Hub, supports limited integration into automations, and can control accessories via Siri.
Philips Hue White and Color Ambiance

Although it’s a little pricey, Philips Hue remains the gold standard in smart home lighting. You can find Hue lights in every conceivable form factor, from standard A19 bulbs to light strips and HDMI sync boxes. Their best feature may be the Hue hub, which connects up to 50 lights and lifts the burden off your Wi-Fi network.
Alternatives: The best smart light bulbs
We’re recommending a White and Color Ambiance Starter Kit with three color bulbs, a hub, and a wall-mounted button switch, but you can find cheaper Hue kits without much searching. Do make sure you have a Hue hub, no matter what.
Ecobee SmartThermostat with Voice Control

The Ecobee SmartThermostat is the top HomeKit-compatible thermostat on the market. Not only does it have an easy touchscreen interface and full integration into HomeKit controls and automations, but it also operates as its own smart speaker for either Siri or Amazon Alexa. If you choose Siri, you’ll need a HomePod set up as a Home Hub — even an iPad or Apple TV won’t work.
The product comes bundled with an external sensor you can use to extend its temperature and occupancy detection to another room. That might seem excessive, but an Ecobee can quickly pay for itself by making heating and cooling more cost-efficient.
August Wi-Fi Smart Lock

A smart lock might not sound like the sexiest accessory, yet it adds a great deal of convenience. Imagine the door locking automatically when you leave the house or unlocking when you return with a heavy load of groceries. HomeKit automations allow things like locking the door when you go to bed or turning on the lights when you open it. August’s latest design has integrated Wi-Fi, so there’s no need to plug a bridge device into your wall.
Logitech Circle View Doorbell

The Logitech Circle View is built expressly for HomeKit, being one of the first to support HomeKit Secure Video so you can save and view encrypted footage in iCloud, and get features like people, pets, and vehicle detection. Perhaps more importantly, it’s just a good doorbell — it has a 160-degree field-of-view, color night vision, and a 3:4 aspect ratio that makes it easier to see packages on your doorstep. Be aware that you’re firmly locked into the Apple ecosystem with this one, since you need a Home Hub and there isn’t even a native Logitech app for it.
