Who Needs a Screen Recording Software for macOS?
MacOS is often the operating system of choice for content creators. Screen recording has some principal uses across several sub-sectors on a world rapidly evolving and undergoing technological development. Wondershare DemoCreator is one of the best screen recording tools available. Not only is the screen recorder for mac highly useful for educators seeking to digitize their teaching methods, but students can also utilize it to work on interactive whiteboards. Software designers may find some useful applications too, as it can be of significant assistance in finding software bugs. There are endless possibilities!
How Can I Record My Screen with Sound?
After downloading and installing the free software from the official website, follow these simple steps to record your screen with sound.
STEP 1 – Open the Wondershare DemoCreator program and click the red ‘Capture’ button to start recording your screen. You can also directly open the video editor if you have previously recorded your screen or videos.
 STEP 2 – The pop-up window will appear on your screen. You can adjust the region of the screen you want to record by moving the border. The region can also be adjusted by manually entering the pixel dimensions you wish to record.
 STEP 3 – You can reposition your recording region by dragging the large plus like icon at the top left corner of the region. If you press Shift+F then it will simply switch back to full-screen recording.
 STEP 4 – The audio and webcam buttons are located on the right side of the screen; Clicking the microphone icon will toggle audio recording and clicking the webcam icon will toggle webcam video recording respectively. It is important to ensure that your microphone and webcam are connected securely to your device.
STEP 5 – The audio slider can be adjusted to simply control the sound volume for your recording device. It can be adjusted to the desired level.
STEP 6 – Once you are ready, recording can be started by pressing the “Start Capturing” icon (Red button) or the F10 key.
STEP 7 – DemoCreator will begin a 3-second countdown before the actual recording starts.
 STEP 8 – The recording can be paused at any time using the pause icon or the F9 key. It can be resumed similarly using the resume icon or by pressing the F9 key again.
STEP 9 – Pressing the F10 key or the Stop Recording button (Red button) again will end the recording.
STEP 10 – The recording video is saved and stored automatically and opened in the video editing interface.
How Can I Record Audio and Screenshot Using Wondershare DemoCreator?
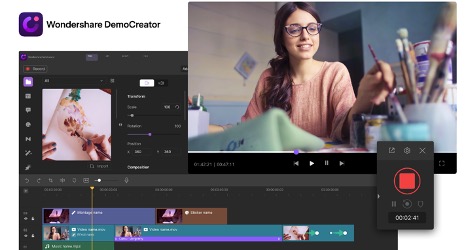
The video editor contains four main regions in the user interface; the media library, preview window, properties window, and timeline. Each region contains various features which will be explained in the coming steps.
The media library allows you to import video, audio or add files, insert annotations and stickers, select transitions, montages, and cursor effects as well as view clip previews. An extensive library is available for you to choose from.
You can simply click on your clips and drag them to the timeline to add them to your project.
 Once the video clip is in your timeline, it can be muted or the audio can be separated for individual editing.
To mute the audio of a clip, simply click on the clip and select “Mute Audio”. The audio will be suppressed.
To detach the audio from the video, right-click on the clip and select “Audio Detach” and a separate audio file will be generated.
 The detached audio file will be placed in the timeline automatically, and you will be able to edit it separately from the video clip. You can also cut, copy, split or delete the file as you want. Mute audio, freeze frame, and add marker features can also be used to edit the audio.
Some functional icons are available at the bottom of the preview area; apart from basic forward, backward, play, stop buttons, and volume adjustment, you can also capture a snapshot or record an audio voiceover.
Use voiceover to record yourself talking; this is a great way to give viewers more information; just click the voiceover icon in the toolbar. The audio recording once completed will automatically be placed on the timeline. Video playback is also available while recording your audio. This allows you to record audio without worrying about syncing issues later on. It is important to ensure your audio recording device is properly connected before beginning the recording.
A snapshot of a video frame can be captured using the snapshot icon which looks like a camera, placed near the bottom right of the preview window.
Adjust the scale of the clip in the preview region by dragging the white dots at the edges to resize it. Video transform, compositing, and speed of the clip can also be adjusted from the properties window. You can set it up with ease!
Apart from captured videos, you can also import and edit your own videos and apply editing features such as denoising, volume adjustment, duration adjustment, and speed setting. You can also apply annotation, green screen, caption, transition effects to your videos when editing to make your video more interactive.
You now have all the advanced tools to create the perfect video!
Conclusion- Free to Download, Worth a Chance!
Even an amateur video creator or beginner can use this software in no time to create high quality and professional grade instructional videos. There are not many free options available for screen recording software on the macOS but Wondershare DemoCreator is an excellent choice for you. It is also supported on Windows and therefore is ideal for cross-platform collaboration as well.
It is an excellent tool for aspiring content creators, educators, students, or simply tech enthusiasts. Download DemoCreator software now and use the superior range of templates to put together a mesmerizing video!